Character Studio – Biped and Physique
Biped can be found in the Systems rollout. Click on biped, and in the perspective viewport click and drag a biped skeleton.
The different bones of the biped can be selected and moved, rotated or scaled. The biped has a built in IK and FK system, making them very easy to manipulate and move.
To re-shape the biped to fit your mesh
With the biped highlighted go to the motion panel. Within the motion panel you need to click onto Figure Mode. Look down the motion panel to the structure rollout. Here you can select the bones and control how many bones the biped contains. Here you can specify whether your biped should have no arms (if you were making a hen for instance), a tail, several neck bones etc. If you click bend links with the tailbones highlighted you can make the tail bend.
What is FK and IK?
When using FK, any chain of links is dominated by the initial link (or the parent). When the parent moves so do the children. If you scale the parent, the children will scale as well.
IK is the reverse of FK, in other words it is the child that can affect the movement of the chain and transfer that movement to the parent.
Biped is cleverly set up with both systems.
Physique
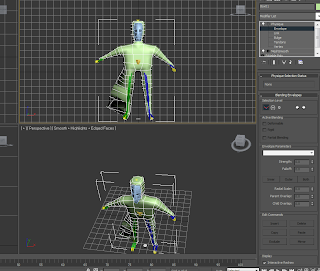
You should make sure that your model is placed in the Da -Vinci pose, with arms and legs outstretched before you use the physique modifier. Make sure your model is in see-through mode, by right clicking the mesh and checking the make see-through box in the object properties dialogue box. (Or use alt x)
The bones of your biped can be around three quarters the size
of your mesh, or can even be larger than your mesh.
With your mesh highlighted, go to the modify panel, and scroll down to the physique modifier.
To identify the biped, you need to attach the node, by clicking the attach node button in the rollout and then selecting the pelvis. When you have done this orange lines will run throughout the biped.
Adjusting the envelopes

More than likely when you move the arm of the biped down to the side of the model, you will see how the mesh pulls. This can be remedied by entering the sub object level of the physique modifier. Click on the small + sign on the physique modifier in the modifier stack. Here you can click on envelope. If you make sure that your model is in smooth and highlight mode, you can see how the mesh will react to changes in the envelope. The envelopes weight and influence the mesh.
Select your mesh – and change to wire frame mode, so that you can see the bones clearly. If you click on the yellow line running through the bones, you will activate the envelope. Where the envelope is influencing the mesh 100% it will be red in colour, if it isn’t influencing it will appear purple.
You can alter the envelopes using radial scale, parent overlap and child overlap, and you can influence the outer or inner side of the envelope or both sides at the same time. You will see the mesh snap back to the bones. If you check shading on the display area of the rollout you can see the weighting quite clearly on the mesh with a colou
r code, in a similar fashion to soft selection.
Creating footsteps

Footsteps can be created automatically or manually.
To produce automatic footsteps, select a bone on the biped, this will activate the motion panel. Click footstep creation button, and a dialogue box will appear with several options for creating footsteps including how many footsteps you require. Click OK and you will see the footsteps have automatically appeared.
If you go to playback the animation nothing will happen until you activate the footsteps. In the motion panel click Create Keys for biped footsteps. The animation should now work.
To produce manual footsteps, select a bone on the biped, click on footsteps, now click on creat footsteps at current frame button. Click and create the footsteps in the top viewport.
You can choose walk, run and jump. Create Footsteps append will add in footsteps if you wish to make your walk sequence longer.
http://0819379.blogspot.com/2011/04/3ds-max-problem.html
ReplyDeletePlease when you have to have a look at that
ReplyDelete