Click and drag a sphere in the front viewport. Turn on Autokey and move the sphere to the centre of the bottom of the viewport at keyframe 50 and then to the top right hand side of the viewport at keyframe 100.
Right click on the sphere and in Object Properties click on Trajectory.
- The white boxes represent the key frames for the animation
- The white dots represent the frames.
You will notice that the white dots are very close together at the beginning of the trajectory and wider spaced in the middle at frame 50.
- Frames which are close together the animation is slow
- Frames which are far apart the animation is fast
Therefore when you look at this trajectory you will see that the sphere starts slowly and gets faster by frame 50, by frame 100 it is slowing up again. Realistically this w
ould not be the case, if this sphere represents a ball bouncing, the ball would get faster when dropped from a height, would be at its fastest at frame 50 and would bounce out fast loosing its acceleration by frame 100.
This can be changed by using Key Tangencies. If you right click on the key at frame 50, sphere 01 X position, you can use the control box to change the tangent to Fast in and Fast out. When you change this watch the trajectory on the animation and how it changes.

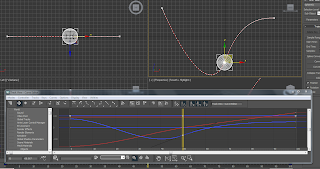
Curve Editor
You can access the curve editor by going to the Graph Editors pulldown or clicking on the small graph sign on the tool bar. This displays the function curve of the animation.
The red graph = X value
The green graph = Y value
The blue graph = Z value
If you right click the small grey boxes on the curve - up comes the same control box to change the tangencies of the curve. To change the slope of the curve manually you use the small handles, and the curve will match the tangent chosen.
Click on the graph icon and Out of Range Tangent Types dialogue box appears. This allows you to step your animation, loop the animation etc.

No comments:
Post a Comment