Go to the create panel > shapes > circle and drag a circle in the front viewport.
Now click and drag a sphere next to the circle.

With the Sphere highlighted, go to Animation on the top toolbar and click on Constraints > Path Constraint.
You should get a dotted line which is coming from the sphere. Click on the circle and you will find that the sphere will jump to the circle.
Now if you play the animation, the sphere will rotate following the path of the circle. 3DS Max has tweened the animation for you.
In the motion panel, you will see that the path constraint has been added to the position list. In the Path parameters you can add weighting to the object that is animated on the path.
If you click and drag a long box and allocate a path constraint to it, you can then see that it has difficulties following the path. Therefore you have to check the ‘follow path’ option and the box will follow correctly.

Using the path constraint with a camera
Now click and drag a teapot into the centre of the perspective viewport. Click and drag a circle around the teapot in the top viewport.
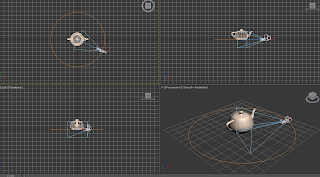
Go to camera > target camera. Click and drag the target camera to the centre of the teapot. With the camera highlighted, go to animation > constraints > path constraint. Then click on the circle. Now the camera will snap to the circle and you can get a rotating camera-eye view of the teapot.

If you want to produce a fly through camera action use the path constraint with a camera. Try setting up some objects and get the camera to fly around them using a path.
No comments:
Post a Comment